Thursday, October 2, 2014
Samsung Galaxy Note 8 0 Tips and Tricks
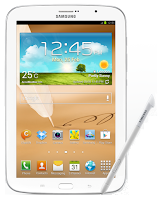
Here are some How Tos for your Samsung Galaxy Note 8.0. These How Tos may still not yet complete and I am still working on the others:
How to Factory Reset Samsung Samsung Galaxy Note 8.0
Restoring the default settings or factory reset your Samsung Galaxy Note 8.0 will delete all your existing files. It is recommended to backup your important files on your computer before attempting to reset your device.
The steps below are the instructions on how to factory reset your Samsung Galaxy Note 8.0:
Step 1. On your HomeLcd, tap on MENU icon.
Step 2. Select "Settings", then scroll down and tap "Backup and reset" option.
Step 3. Then tap on “Factory Data Reset”.
Step 4. Read warning carefully before tapping the “Reset Device”.
Step 5. If you want to proceed in resetting your device, tap on “Delete All” to confirm the Reset.
Now, you just need to wait while your device is resetting. It should reboot itself and you will have a new start on your Samsung Galaxy Note 8.0.
You may also use the shortcut method using the code: Enter *2767*3855# on your device.
How to Reduce the Battery Consumption on Samsung Galaxy Note 8.0
Battery Life depends on how you use your device. For Samsung Galaxy Note 8.0 device, if you want to save your battery to last longer hours, you may need to adjust your settings.
All of us want to have a longer battery life on our phones. Follow these suggestions to reduce the battery consumption:
- Switch to Sleep mode by pressing the Power key when you are not using your device.
- Close any apps or features when you are done using it so they will not continuously running in the background.
- Turn off the network connection if you are out of range so that your device will stop searching for a network signal. (deactivate the Bluetooth feature, turn off the Wi-Fi feature when not in use, etc).
- Deactivate auto-syncing of applications.
- Decrease the backlight time.
- Lessen the Lcd brightness and the Lcd lock timeout.
Extend battery life when the Pen is attached:
- From your Home Lcd, tap on Apps icon.
- Select Settings, then go to S Pen.
- Then tap on Battery saving.
How to Reformat Memory Card on Samsung Galaxy Note 8.0
Formatting the memory card on your Samsung Galaxy Note 8.0 will delete all the files that is stored on the memory card. It is recommended to backup your important files on your computer before attempting to format your memory card.
You may not be able to reformat your memory card on your computer. So try it through your device:
1. On your Home Lcd, tap Apps.
2. Select Settings.
3. Go to Storage.
4. Then tap Format SD card.
5. Just follow the on-Lcd instruction on how to confirm the format.
How to Secure Your Samsung Galaxy Note 8.0 (Face Unlock, Face and Voice Unlock, Pattern and Password)
Securing your Samsung Galaxy Note 8.0 is also important, specially if you have a private files that you dont want others to access it. So to prevent others from using your or accessing your personal data without your permission, then you may need to activate the security features. The device requires an unlock code whenever unlocking it.
Setting a face unlock:
1. On the Applications Lcd, tap Settings.
2. Select Lock Lcd.
3. Then choose Screen lock.
4. Tap Face unlock.
Fit your face in the frame to be captured. Then, set a backup unlock PIN or pattern to unlock the Lcd in case the face unlock fails.
Setting a face and voice unlock:
1. On the Applications Lcd, tap Settings.
2. Select Lock Lcd.
3. Then choose Screen lock.
4. Tap Face and voice.
Fit your face in the frame to be captured and then set a voice command. Then, set a backup unlock PIN or pattern to unlock the Lcd in case the face and voice unlock fails.
Setting a pattern:
1. On the Applications Lcd, tap Settings.
2. Select Lock Lcd.
3. Then choose Screen lock.
4. Tap Pattern.
Draw a pattern by connecting four dots or more, and then draw the pattern again to verify it. Set a backup unlock PIN to unlock the Lcd when you forget the pattern.
Setting a PIN:
1. On the Applications Lcd, tap Settings.
2. Select Lock Lcd.
3. Then choose Screen lock.
4. Tap PIN.
Enter at least four numbers, and then enter the password again to verify it.
Setting a password:
1. On the Applications Lcd, tap Settings.
2. Select Lock Lcd.
3. Then choose Screen lock.
4. Tap Password.
Enter at least four characters including numbers and symbols, and then enter the password again to verify it.
Setting a face unlock:
1. On the Applications Lcd, tap Settings.
2. Select Lock Lcd.
3. Then choose Screen lock.
4. Tap Face unlock.
Fit your face in the frame to be captured. Then, set a backup unlock PIN or pattern to unlock the Lcd in case the face unlock fails.
Setting a face and voice unlock:
1. On the Applications Lcd, tap Settings.
2. Select Lock Lcd.
3. Then choose Screen lock.
4. Tap Face and voice.
Fit your face in the frame to be captured and then set a voice command. Then, set a backup unlock PIN or pattern to unlock the Lcd in case the face and voice unlock fails.
Setting a pattern:
1. On the Applications Lcd, tap Settings.
2. Select Lock Lcd.
3. Then choose Screen lock.
4. Tap Pattern.
Draw a pattern by connecting four dots or more, and then draw the pattern again to verify it. Set a backup unlock PIN to unlock the Lcd when you forget the pattern.
Setting a PIN:
1. On the Applications Lcd, tap Settings.
2. Select Lock Lcd.
3. Then choose Screen lock.
4. Tap PIN.
Enter at least four numbers, and then enter the password again to verify it.
Setting a password:
1. On the Applications Lcd, tap Settings.
2. Select Lock Lcd.
3. Then choose Screen lock.
4. Tap Password.
Enter at least four characters including numbers and symbols, and then enter the password again to verify it.
P.S. To learn how to earn Minimum of $4,485 per Week, CLICK HERE and Watch the Video.

11 interesting facts About Google

1. Loan Server
In January 1996, Larry Page and Sergey Brin created a site called BackRub, the forerunner of Google. The site is operated from a server owned by Stanford University, which at that time still a simple shape and use the enclosure of lego.
2. Home page
Display the home page simple Google turns out not because of the minimalist concept. Marissa Mayer (now CEO of Yahoo!) said that the concept is original thought from the founder of Google which is maintained. At that time the founders of Google is indeed not a webmaster and less versed in HTML so that the page view of his face made simple.
3. The first Doodle
Display the first Doodle is a symbol of the Festival Burning Man, Nevada, 1998. The first Doodle was displayed because both Google founders are on the show and wanted to let you know that theyre not in the Office on that week. Since then Google often displays a Doodle that was intended to commemorate a variety of events and figures of the world as a tribute to them.
4. Call employees
Google gives a unique call to employees. For new hires, known as old employees, whereas a Noogler commonly referred to with Xoogler.
5. A little but rich
The founders of Google, Larry Page and Sergey Brin turned out to have only a 16% share of the company. But make no mistake, the amount of the equivalent of 16% of the money is valued at US $ 46 billion.
6. Employees join the rich
Not only the top brass founders and become filthy rich, about 1000 employees also become millionaires since Google released a public company in 2004.
7. Unique Language
Google doesnt just give the option for the countries in the world, but the local languages of a country and also from the world of fiction. You will find the Klingon language from Star Trek, the pirate (Pirate), the language of Java (Javanese) and other weird language.
8. Rent a goat
In 2009, Google hired about 200 goats for one weekend and take it off in the field just to eat the grass. It is intended that the goats that nourish the soil land in areas of their offices in California.
9. Pay dearly
The company paid about US $ 300 million per year to their search engine is installed by default in the browser Mozilla Firefox hosts.
10. The first Tweet
The first Tweet shown Google through their accounts on Twitter that "Im 01100110 01100101 01100101 01101100 01101001 01101110 01100111 00100000 01101100 01110101 01100011 01101011 01111001 00001010" which means "Im Feeling Lucky" in binary code.
11. "Im Feeling Lucky Button
Google Im Feeling Lucky button is included for users who do not wish to continue the search. However this turns out, the key of the unique impact on the loss of income from Google ads. Even with the existence of the button, Google lost revenue estimated at up to US $ 110 million each year. However until now Google still puts the button with the reason that everything that is manifested not merely about Google money.
How to Factory Reset Hard Reset Samsung Galaxy Express
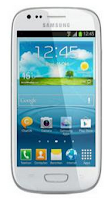
The steps below are the instructions on how to factory reset your Samsung Galaxy Express:
Step 1. On your HomeLcd, tap on MENU icon.
Step 2. Select "Settings", then scroll down and tap "Backup and reset" option.
Step 3. Then tap on “Factory Data Reset”.
Step 4. Read warning carefully before tapping the “Reset Device”.
Step 5. If you want to proceed in resetting your device, tap on “Delete All” to confirm the Reset.
Now, you just need to wait while your device is resetting. It should reboot itself and you will have a new start on your Samsung Galaxy Express.
Now, you just need to wait while your device is resetting. It should reboot itself and you will have a new start on your Samsung Galaxy Express.
You may also use the shortcut method using the code: Enter *2767*3855# on your device.
Hard Reset:
- Press and hold the Power button, Volume Up and the Home Key at the same time.
- Hold these buttons until your phone vibrates, then release the Power button.
- Hold the Volume Up and the Home Key until you see the Android icon.
- Then choose the Factory Reset option.
HTC Desire C

HTC Desire C makes it easy to connect and plug into fun. Call or message and note how HTC Sense minimizes navigation for simplicity. Quick social upload means go from picture capture to share effortlessly. Continue the fun with rich, authentic sounds brought to you by Beats Audio.
HTC Desire C with Beats Audio
The new, integrated music experience makes it easy to access all your music libraries, favorite audio apps and Internet radio simultaneously from one convenient location.
Easy to Shoot and Share
A 5MP camera with a redesigned, and more intuitive camera application means with HTC Desire C you are always ready to capture a moment. And with deeper social integrations through Facebook and Twitter, you are just a few taps from sharing that moment with the world.
A special offer for you : Get 25 GB of Dropbox space free for two years
Visit the Dropbox site for full Terms and Conditions of the offer
With Dropbox integrated into HTC Sense, you can automatically save all your photos and videos to Dropbox – and access and share all your pictures directly from the Gallery. Dropbox also makes it easy to edit and share files while you are on the go, so you never have to email yourself a document again. To discover all that Dropbox can do, sign-up or log-in to Dropbox on your HTC Desire C and receive 25 GB of Dropbox space free for two years.
(Source: HTC Global)
Playlist HTC Desire C
| Tech Specs HTC Desire C | |
| General and Software | |
| Other names or variations | HTC Desire C - HTC Wildfire C – HTC Golf |
| Form Factor | Candybar |
| Operating System | Android 4,0.3 Ice Cream Sandwich – HTC Sense 4 |
| Physical Keyboard | No, virtual QWERTY keyboard |
| Announced | 15 May 2012 |
| Status Available | June 2012 |
| Browser & Internet | HTML, HTML5 |
| Adobe Flash Support | Yes |
| Java | MIDP |
| Display | |
| Size, diagonal | 3.5 inches - 88.9 mm |
| Display Resolution | HVGA – 320 x 480 pixels |
| Generalized Pixel Density | 165 ppi |
| TFT – Touchscreen – Capacitive – 16 M colors - dust and water resistant | |
| Connectivity | |
| WAN / Network 2G | GSM: 850 / 900 / 1800 / 1900 MHz |
| WAN / Network 3G | UMTS: 900 / 2100 MHz (Europe / Asia) |
| WAN / Data | GPRS / EDGE – HSDPA / HSUPA |
| 4G | No |
| Wireless LAN | Wi-Fi IEEE 802.11 b / g / n – Wi-Fi hotspot |
| Bluetooth | Bluetooth 4 |
| USB | micro-USB 2.0 (5-pin) port – Mass storage – Charging connector |
| Audio jack 3,5 mm | 3.5 mm stereo audio jack |
| GPS / Location Based Services | A-GPS |
| NFC – Tethering | |
| Camera | |
| Camera Resolution (max) | 5 megapixels (2592 x 1944 pixels) – f2.8 – Focal length 34 mm |
| Camera secundary | No |
| Camera Focus | Fixed |
| Camera Flash | No |
| Additional Camera Features | Geotagging |
| Media | |
| Audio Player | Playback: .AAC, .AMR, .OGG, .M4A, .MID, .MP3, .WAV, .WMA9 Recording: .AMR |
| Video Player | Playback: .3GP, .3G2, .MP4, .WMV9, .AVI (MP4 ASP AND MP3) Recording: .MP4 |
| Video Recording | VGA 640 x 480 pixels |
| Video Playback | VGA 640 x 480 pixels |
| Beats Audio | |
| Speakerphone | Yes |
| Loudspeaker | Yes |
| Radio FM | Stereo FM radio with RDS |
| Voice Recording | Voice dialing – Voice commands – Voice recording |
| Processor and memory | |
| Processor Clock Speed | 600 MHz |
| RAM | 512MB |
| Internal memory | 4GB |
| Memory Card Type | microSD |
| Memory Card Size Supported | Up to 32GB (SD 2.0 / SDHC) |
| Sensors | |
| Accelerometer | Yes |
| Proximity Sensor | Yes |
| Ambient Light Sensor | Yes |
| Notifications | Vibration, MP3, WAV, Polyphonic |
| Power | |
| Battery Type | Standard Li-Ion 1230 mAh |
| Divers | |
| Messaging | SMS, MMS, IM, (IMAP, POP3, SMTP) Push Email |
| Games | Yes, downloadable |
| Color | Polar White, Stealth Black, Flamenco Red |
| Phone Book | Yes |
| Organizer | Yes |
| Agenda | Yes |
| Calendar | Yes |
| Task | Yes |
| Notes | Yes |
| Predictive text | Yes |
| Watch | Yes |
| Alarm | Yes |
| Diary | Yes |
| Calculator | Yes |
| Documend Viewer | Yes |
| Flight mode | Yes |
| Weight | 98 grams |
| Dimensions | 107.2 x 60.6 x 11.95 mm |
| Google Mobile services | |
| Dropbox: 25GB | |
| Computer Synchronization, OTA Synchronization | |
Gallery:


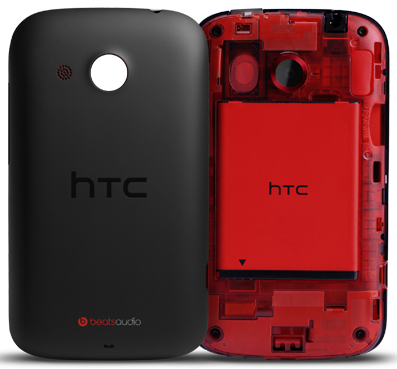
Available in polar white, stealth black and flamenco red


Resources:
HTC Global - English - HTC Desire C
HTC España - HTC Desire C
Support - English - HTC Desire C
Soporte - Español - HTC Desire C
Wednesday, October 1, 2014
Self Test Print for Epson Printers

Heres how the self test print for Epson printers. Self test print test is done without using a computer, so for the purposes of service printers, can be done without using a computer without the need to install the drivers, of course.
How to self test print for Epson printer:
1. For Epson type C series: C41 C42 C43, C45, C58, C61, C62, C63, C65, C67, C79, C85, C90, C87, C86, etc.
For Epson R series: R210, R230, R230X, R270, etc.
For Epson T-type series: T11, T20, T13, T13X, etc.
For Epson type L series: L100, L110 L200 L210, L300, L310, etc.
Heres How:
- Make sure the printer in die/off
- Press the resume should not be removed
- Press the power button (1 x then off) while pressing the resume
- Fixed press resume 4-5 seconds, then off
2. For Epson CX type series: CX Series: CX 4300, CX 3600, CX3700, CX 5100, CX 4900, CX 5900, etc.
Heres How:
- Press the power button do not removed
- Then press the ink/ink should not be removed
- Wait until the power indicator light flashes 1 x
- Then disconnect both the power button and ink simultaneously.
I hope these tips are helpful.
Good Luck.
Return to the Start Screen of Windows 8 8 1 to erlier conditions
Windows 8/8.1 has the look of the Start Screen that is different from earlier versions of Windows. On the Metro or Modern UI mode, the application that is installed is displayed in the form of Tile. But what if the display is already too much and you want to return it to original condition? For that you can do the following simple steps:
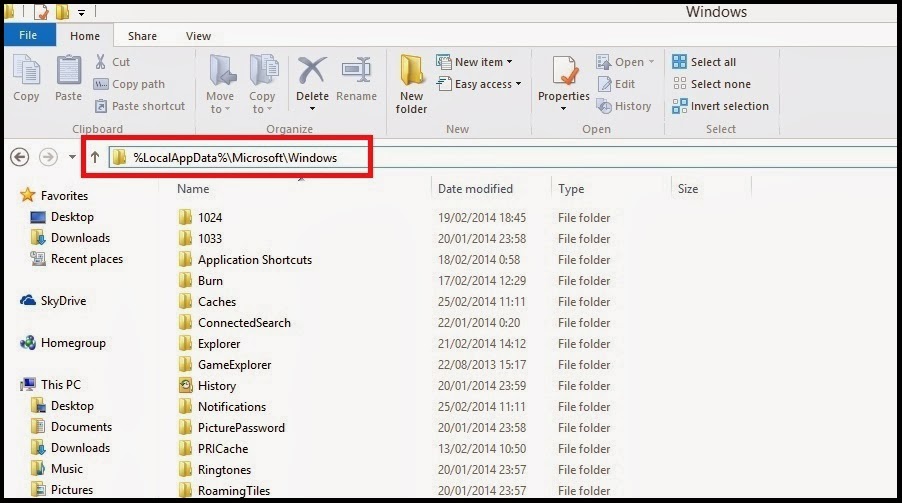
1. go to the look of the Desktop, open the Window Explorer, and type the following commands in the address bar%LocalAppData%MicrosoftWindows.
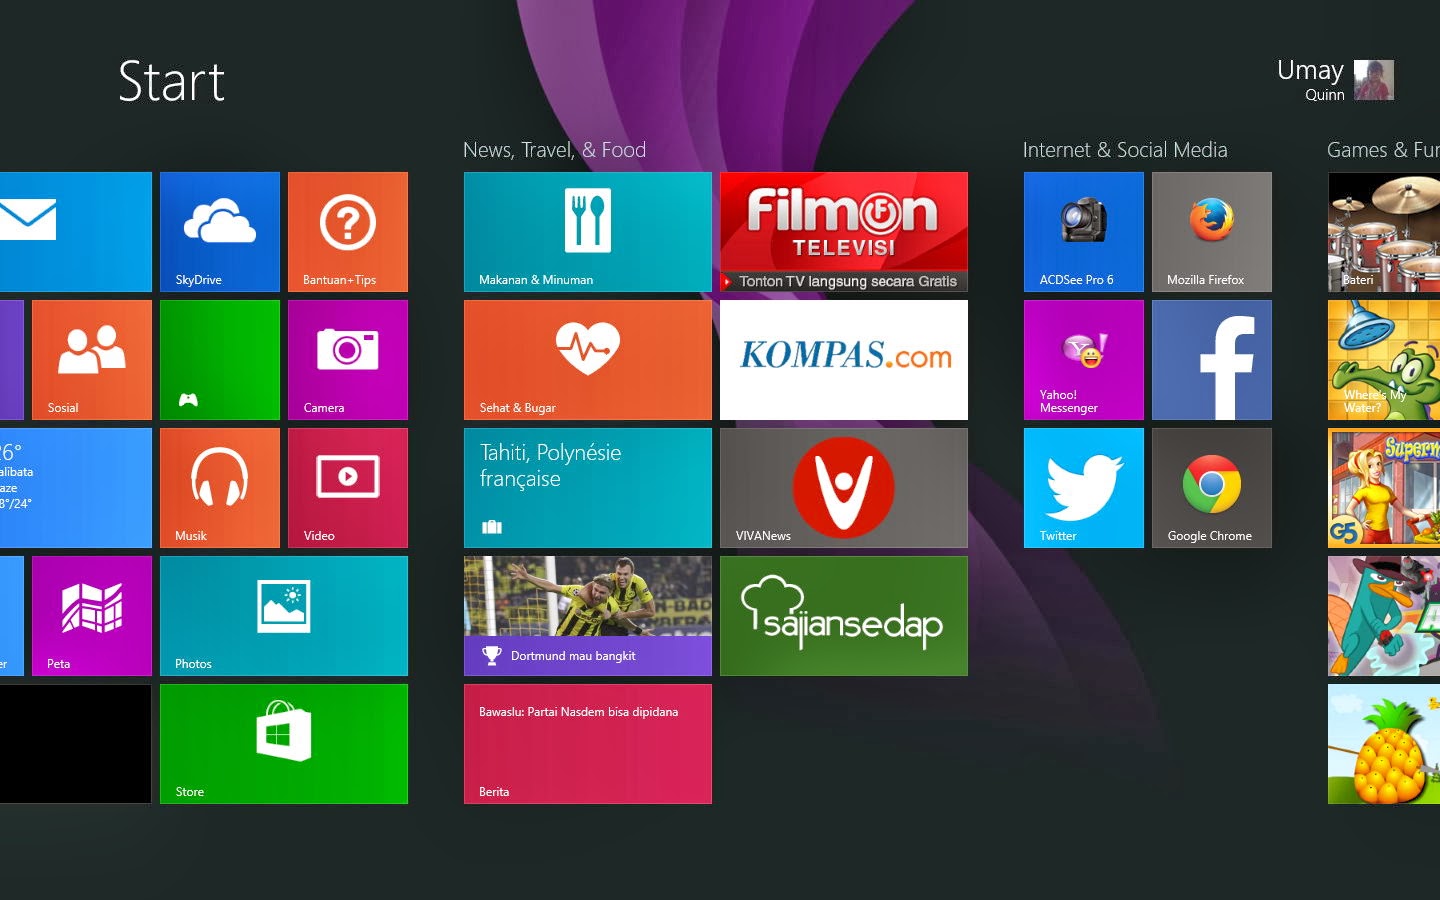
Or it could be by directly pressing the Windows key + R to go to the Run dialog box, and type%LocalAppData%MicrosoftWindows.
2. in this folder you will find two files, namely appsFolder.-ms itemdata and appsFolder.-p. itemdata bak. If you want to return to the Start Screen display the initial conditions in Windows 8/8.1, you delete the two files reside. Next restart.
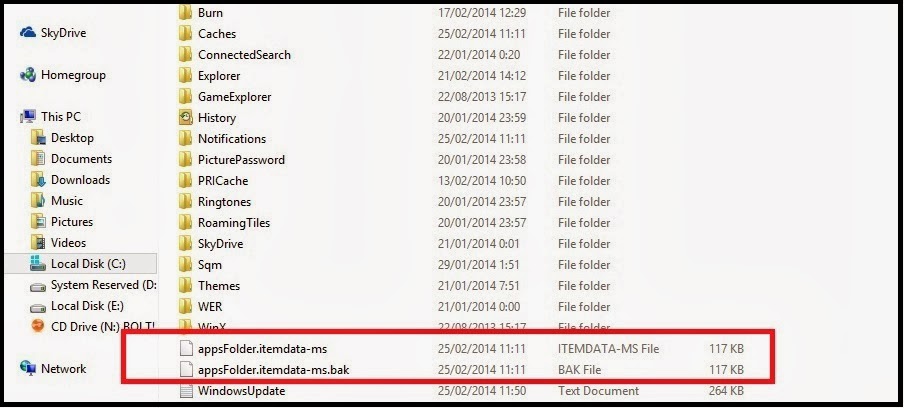
3. you can also save the two files to a different folder if one time it wants to return to the Start Screen display. How to restore it just put the two files into the folder again.
Remove the Tile will not remove (uninstall) the application. Existing applications will not be lost and remain there. If you want to uninstall the application completely, you can do it Uninstall through Control Panel.
How to Factory Reset Hard Reset Samsung Galaxy Young
Restoring the default settings or factory reset your Samsung Galaxy Young will delete all your existing files. It is recommended to backup your important files on your computer before attempting to reset your device.
The steps below are the instructions on how to factory reset your Samsung Galaxy Young:
Step 1. On your HomeLcd, tap on MENU icon.
Step 2. Select "Settings", then scroll down and tap "Backup and reset" option.
Step 3. Then tap on “Factory Data Reset”.
Step 4. Read warning carefully before tapping the “Reset Device”.
Step 5. If you want to proceed in resetting your device, tap on “Erase everything” to confirm the Reset.
Now, you just need to wait while your device is resetting. It should reboot itself and you will have a new start on your Samsung Galaxy S3.
You may also use the shortcut method using the code: Enter *2767*3855# on your device.
Hard Reset:
1. Turn off your device.
2. Then press and hold Volume Down + Home Button + Power On.
3. Wait for a few seconds until the Factory reset menu appears.
4. Select "wipe data/factory reset" by using the Volume Down button.
Subscribe to:
Posts (Atom)