Showing posts with label and. Show all posts
Showing posts with label and. Show all posts
Monday, November 24, 2014
Recycle bin APP for blackberry the Best APP to Restore your Contacts
To restore your BlackBerry data from a previous backup session :
- Connect your BlackBerry to your desktop PC using the supplied USB cable or cradle.
- Run Desktop Manager and double-click Backup and Restore. This brings up the Backup and Restore screen.
- Click the Restore button.
- Navigate to the location where your backup .ipd file is stored, select the file, and click Open.
- At the prompt, click Yes to restore all of your original BlackBerry data from the specified backup file.
As with the backup function, you can choose to perform a selective restore on one or more specific databases, rather than choosing to restore all of your BlackBerry data. This option is useful if one of your application databases has been damaged or deleted or if you are moving to a different BlackBerry handheld and you want to move only certain data over from your old handheld.
- Connect your BlackBerry to your desktop PC using the supplied USB cable or cradle.
- Run the BlackBerry Desktop Manager application on your PC, and double-click the Backup and Restore icon from the main screen. This brings up the Backup and Restore screen.
- Click the Advanced button.
- Choose the file to restore from by clicking File Open.
- Navigate to the .ipd file you want to use and then click Open to select the databases you wish to restore from the Desktop File Databases section.
You can perform a selective restore from either a full backup or a selective backup.
Not only on pc computer or laptop, your blackberry is also available on application to restore data that has been deleted. Applications Recycle bin is also named.
Recycle bin APP on the blackberry is used only to Restore your Contacts, Memos, Calendar, Tasks, and Mails after deletion.
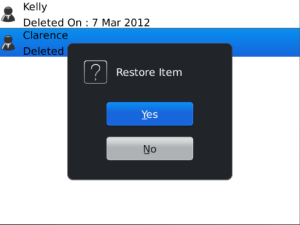
The recycle Bin stores all your deleted E-mails, Contacts, Tasks, Memo and Events in separate tabs. You can easily find your deleted items and then restore them back.
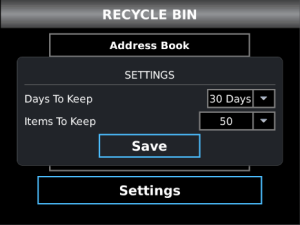
Use Recycle bin APP to Restore your Contacts, Memos, Calendar, Tasks and Mails.
Recycle bin APP features :- Stores your deleted items safe
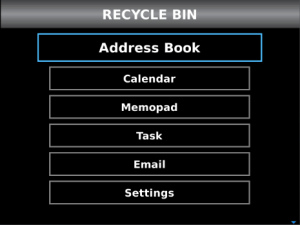
- Items included in Recycle Bin are: E-mails, Contacts, Tasks, Memo and Events

Saturday, November 22, 2014
BBM Now Updated With Cool Privacy Controls And More Features
The Blackberry have released an enormous update for the BBM(Blackberry Messenger) at major platforms. If you guys do not remember, some features have already released on beta app a month back.
The very latest update comes having several handy features aboard, including the capacity to send timed mail and messages. With Timed Mail and messages, users can established a timer on the sent message. Following the timer runs-out, the message will automatically disappear.
Moreover, the update also let users get back their sent messages, which messages that has removed from your BBM chat, plus the ability to transfer good quality images via BBM. Here’s a summary of features introduced with the latest BBM up-date:
- Timed Mail or Messages: Set how long contacts can access to have messages and pictures shared in a chat
- Message Retraction: You can easily (Retract) a message to remove it from your BBM(Blackberry Messenger) chat
- An awesome and quicker sticker picker: You guys can add stickers on your BBM chats is even quicker with a new picker program
- HIGH DEFINITION Picture Transfer: It is now quite easier than ever to have a high quality version of the pictures you get in BBM
- Find out Music: See what audio your contacts are hearing in BBM Rss feeds.
Source: Blackberry
Friday, November 21, 2014
Far more Images Of the iPhone 6 Leak Featuring Its Power Button And Front Panel
There aint a tremendous amount we can assemble from these photos (via Mac Rumors), but they do seems to be consistent with previous leaks weve already seen. The images showing the front plate suggest that the iPhone 6 may have rounded edges much like "iPad Air".
Heres what the throughout the iPhone 6s front panel supposedly seems like:
And also another shot of the front shell showing the spot that the home button would be. Notice the round edges.
This specific image supposedly shows an element Apple will use for the iPhone 6s Touch ID home button.
We expect for more information about the iPhone 6 the very next month, when Apple is rumored to keep an event for you to introduce its brand-new smartphone. In addition with a larger and thinner design, rumors suggest another iPhone could include a scratch-resistant screen made from sapphire and several improvements to its camera. Apple is expected to release 2 brand-new iPhone this season, one with any 4. 7-inch display and another with a little more bigger 5. 5-inch display-screen, but its cloudy if theyll debut at the same time.

Nvidia launches much better graphics processors GTX 970 and GTX 980
The processors give attention to high-end performance specially regarding PC gaming, in addition to guarantee higher power efficiency than old models, Nvidia authorities called a press conference meeting in Seoul.
These GPUs will likely gonna allow (Nvidia powered) machines to proceed video game environments with higher resolution and more cool lighting.
The actual GTX 970 & 980 models provide the companys Maxwell chips architecture, It does take engine of "next generation" with cool-gaming, resolves some of the most complex lighting problems along with graphics challenges throughout visual computing.
Nvidias latest technology, Voxel Global Illumination "VXGI" allows gaming GPUs to deliver real-time dynamic global illumination for the very firs time in the gaming world.
By using this technology, a lot of PC games are gonna significantly improved, as the graphics are often more lifelike with the actual games lighting interacting realistically exact environment. This gonna take gamers to the next level of lifelike gaming.
Nvidia co-founder and ceo Huang Jen-Hsun said : "Maxwell is already in development for years it always inspire our gamers and manufactured by the best minds inside 3D graphics company.
Nvidia also mention the extraordinary performance, efficiency and engineering would authorize developers to try and obviously do their finest operate and awesome gamers worldwide.
Maxwell makes it possible for developers to conquer these obstacles, combining the effectiveness and programming capacity required to model direct and also indirect light resources.
Friday, November 14, 2014
HTC One M8 Aqua Blue and Red is now official in United Kingdom
.jpg)
HTCs 2014 flagship handset One M8 is already available in Gunmetal Gray, Glacial Silver and Amber Gold, but now the firm has officially made available in the previously leaked Blue and rumored Red color codes from an online retailer in the United Kingdom. The smartphones are now all set for pre-orders from MobileFun in Aqua Blue and Red color options, coming in 16 gigabytes version, unlocked or SIM-free. The new Taiwanese smartphones will cost you 549.99 British Pound Sterling, each, which as high as 925 United States Dollars. The exact launch dates are not confirmed at the moment.
Other than the new paint jobs over the sleek aluminium construction, the phone will remain exactly the same from its internals, packing in a Quad-Core Qualcomm Snapdragon 801 processor, speeding at 2.3GHz with Krait 400 cores, Adreno 330 GPU, five-inches Full High Definition screen of 1080p resolution, 16 gigabytes of expandable mass storage, two gigabytes of RAM, duo-camera on the back of four Ultrapixels, for better selective focus and more depth in the taken images, dual-tone LED flash lights for great night photography in low light conditions, a five megapixels front facer, sporting wide angle lens, Bluetooth 4.0, NFC, IR Blaster, 4G LTE network support, along with a dedicated HTCs proprietary front sided dual-stereo BoomSound speakers, BlinkFeed homescreen a 2,600mAh powered battery and runs Androids version 4.4.2 KitKat with companys own new Sense User Interface 6.0 over the hood.
There are new features on board, which included Motion Launch, allowing HTC One 2014s users to wake up the display by swiping up from the bottom of the screen and also to launch the camera application by just picking up the phone in landscape mode by tapping the volume button and the phone has also got on-screen navigation buttons.

Source: MobileFun.co.uk 1, 2
Thursday, November 13, 2014
LG isai FL leaks again this time in Pink and specs gets revealed
.png)
This past Wednesday we got a glimpse of the above device for the first time, where today too, evleaks from Twitter has the upcoming smartphone in a new flavor. The yet to go official phablet, isai FL for Japanese carrier au by KDDI from the South Korean consumer electronics manufacturer LG again gets captured and leaked in a new Press render, this time in Pink color option. Unlike last time, its not just the phone we have to show you, but also the upcoming handsets internal specification details.
According to evleaks, the new phone from LG will sport a Quad-Core Qualcomm Snapdragon 801 processor clocked at 2.5GHz, 5.5-inches Ultra High Definition LCD screen, rumors suggests us about a 2K 2560 x 1440 resolutions kind, 32 gigabytes of internal mass storage option (expandable via microSD card slot), two gigabytes of Random Access Memory (RAM), packing in a 3,000mAh powered battery and running Androids version 4.4 KitKat out of the box. The new LG made isai FL is also said to feature IPX7-certifications, meaning the unannounced Japanese exclusive phone will be water resistant. Following LGs past flagships design code, this new phone too rocks its volume up and down buttons on the back, right under the camera, a doubtful fingerprint reader left to the volume keys, with really thin overall bezels on the front and on screen virtual navigation buttons. We still lack any information on the upcoming phablets availability and pricing details, but will see the device go official in White, Blue and Pink color options.
Source: evleaks (Twitter)
Monday, November 10, 2014
Leaks hints Samsung Galaxy Gear 2 and Galaxy Gear 2 Neo

These new leaks coming all the way from evleakss Twitter account suggests us the next generation South Korean smart wearables. The new smartwatches manufactured by Samsung is reportedly coming to the markets in two different models, named the Galaxy Gear 2 and Galaxy Gear 2 Neo, respectively.
The past month we heard it from the companys Executive Lee Young, that the Koreans will bring along the new edition of Galaxy Gear smartwatch with improvements in design and attributing more advanced functions, aside their yet to be announced Samsung Galaxy S5 at the firms upcoming Unpacked 5 Mobile World Congress Press event, this coming Monday in Barcelona, Spain. At this time, the details of what we see is disclosed, where we have just two sets of the unannounced units Press renders, that first showed up in a blurred image (left side), followed by a "Better" one, moments later.
Source: evleaks (Twitter) 1, 2
Saturday, November 8, 2014
IFA brings the new Sony SmartWatch 3 powered by Android Wear and SmartBand Talk

Sony along with the new Xperia Z3, Xperia Z3 Compact smartphones and Xperia Z3 Tablet Compact, yesterday, announced their newest and latest addition of wearables to the companys existing SmartWear Experience, in their IFA Press event in Berlin, Germany.
The new products out from the Japan based manufacturer is named as SmartWatch 3, which is a follow on from their previous generation SmartWatch 2, this time around powered by Googles latest wearable operating system, Android Wear. But, now we also have a new SmartBand Talk, coming with built-in on board microphone and speaker, for phone call conversation, from the connected smartphone, also supporting HD Voice and Sony’s integrated Voice Control technology.
"Life is a journey, and journeys are made up of stories and experiences that define you this is the underlying principle for Lifelog, the Android app at the heart of our SmartWear Experience. Were going beyond mere fitness tracking and number crunching, to help you log and preserve those emotional moments that matter. As a pioneer of smart and wearable technology, SmartBand Talk, SmartWatch 3 and Lifelog don’t merely affirm Sonys leadership in the space, but as the innovators who dare to be different, bringing the world choice; products and services no else can, or will," said Kunimasa Suzuki, President and CEO, Sony Mobile Communications.
Sony SmartWatch 3
So, the latest member from the companys SmartWear Experience, will come in partnership with the American firm, Google. Yeah, the new SmartWatch 3 will feature their new wearable platform, Android Wear, like other Android Wear powered devices official from Motorola, LG, Samsung and ASUS, in the past. Accordingly, this new Sony product will also initiate Googles voice recognition features with the in-built microphone and speaker integration, letting the user get through necessary updates, messages and notifications, before you even ask for it, from the connected Android smartphone, as reported, also being complete waterproofing protection, with IP68-certification ratings. The unit comes out of the box with a Quad-Core Qualcomm Snapdragon 400 processor, clocked at 1.2GHz, a 1.6 -inches 320 x 320 TFT LCD Transflective display for great visibility in outdoor situations and specially under the bright sunlight, four gigabytes of internal storage, 512 megabytes of Random Access Memory, a 420mAh powered battery, offering juice for up to four days of standby.
There is a standard microUSB port for charging the device, and with the mass storage available on the SmartWatch 3, you will be able to seamlessly sync music from the paired device, and hear through a connected Bluetooth headset. The new wearable is efficient enough to track your fitness and play music without the need of a paired/connected smartphone, The smartwatch also embraces a functionality to detect when the user is fast asleep. The device woks well with Sonys official Lifelog fitness centered application, which is available from Google Play for free. The sensors on SmartWatch 3 includes, a accelerometer, compass, gyroscope and GPS for better lifelogging with your brand new wearable. Sonys SmartWatch 3 will ship in Classic Black and Sport Lime color options, alongside interchangeable rubber/silicone straps coming in additional Pink and White shades, which will be available after its launch.

Sony SmartBand Talk
"SmartBand Talk is a powerful lifelogger, built for users who live life to the fullest". Thats how the maker captioned the device on their official blog. Indeed it is one of the very decent wearable we have personally seen in the recent times, which brings in the smaller 1.4-inches e-paper display, which is a low-power consuming but highly visible and clear panel, that will screen the user with every details of activity from the aforementioned Lifelog application, as well as show you with relevant notifications from other apps, synced with the handset. The unit also features call functionality and a number of fitness tracking capabilities. As said above, the SmartBand Talk attributes Sonys fresh HD Voice and integrated Voice Control technology, with built-in microphone and speaker for great and clear conversation over the phone calls.
The incorporated accelerometer and altimeter sensor in the new Sony SmartBand Talk, will provide its users with a complete track record of accurate overview about your daily fitness activities, including walking, running and even climbing. The SmartBand brings you all the collected data information pulled from your smartphone to its e-paper display screen, when you feel to review your fitness over times. As the other SmartWatch 3, the new SmartBand Talk too break the walls with IP68-certifications for water resistance protection. Available in both Black and White tints, with more extra vibrant color options to follow later this year.
Source: Sony
Wednesday, November 5, 2014
Samsung Gear 2 and Gear 2 Neo is now official

Yesterday and earlier today we saw the device pouring in from evleaks and now we have the South Korean multinational electronics manufacturer, Samsung officially announcing their next generation smartwatches in Barcelona, Spain, pre-Mobile World Congress trade show event to be held tomorrow, the Gear 2 and Gear 2 Neo.
The new wearables from the Koreans arrive to the markets with a small difference, instead of Googles Android operating system, the new Gears will run Samsungs own Tizen OS out of its box. The basic design of the new smartwatches will fall in line with the companys first generation Galaxy Gear, with that same brushed metal finish and the only difference we witness here is the shift of camera from the strap to the main watch body. The new Samsung Gear 2 and Gear 2 Neo devices will come equipped with heart rate sensors, pedometers, sporting Standalone Mode for walking and running and a Companion Mode for cycling and hiking, an IRLED Blaster is also installed on each devices for easy remote controlling your TV using the firms WatchOn application.
Other tech specifications of the new fashionable Gear 2 and Gear 2 Neo includes a Dual-Core processor, speeding at 800MHz to 1GHz, 1.63-inches Super AMOLED screen of 320 x 320 resolution display, four gigabytes of internal mass storage, 512 megabytes of Random Access Memory (RAM), 2 megapixels camera on the Gear 2, while Gear 2 Neo lacks a snapper on board. The devices has got Bluetooth 4.0 connectivity, a 300mAh powered battery giving juice from 2 to 3 days, compensating Samsungs and Intels new Tizen based wearable platform, packing IP67-certifications, proving water and dust resistance.
The newly announced Samsung made Gear 2 is measured at 36.9 x 58.4 x 10.0 millimeters and weighs 68 grams, coming in Charcoal Black, Gold Brown and Wild Orange color options. The new Gear 2 Neo is scaled at 37.9 x 58.8 x 10.0 millimeters and 55 grams on weight, arriving in Charcoal Black, Mocha Grey and Wild Orange colors. The units are set to appear in the global market shelves starting April.
Monday, November 3, 2014
2014 One from HTC and Verizon hits eBay before an announcement
.JPG)
The Taiwanese multinational manufacturers yet to go official smartphone of 2014, formerly known as The All New One, or internally codenamed M8 has made another rounds of appearance on the internet, this time too the retail box wearing the United States carriers branding on the package.
HTCs rumored, leaked and talked about handset has been posted up for sales on eBay, which is one of Americas multinational internet consumer-to-consumer corporation. The unofficial device from Verizon Wireless is being advertised with a price tag of 499.99 United States Dollars. With the photos coming in from the seller, it looks like the company has dropped the words, "The All New", only imprinting the traditional HTC One name, for their 2014 flagship smartphone too.
With a new leaked image of the packaging boxs backside, we also confirm the upcoming phones internal specifications, where we will be seeing a Quad-Core 2.3GHz Qualcomm powered Snapdragon 801 processor, five-inches Full High Definition screen of 1080 pixels resolution display, 32 gigabytes of internal mass storage (expandable via microSD card slot up to 128GB), 2 gigabytes of DDR2 Random Access Memory, Duo cameras on the back, of the firms own Ultrapixels kind, compensating BSI sensors, HTCs ImageChip 2 and HDR video recording facilities, a five megapixels front facer, again with BSI tech and wide angle lens with HDR and 1080p video capturing capability, featuring HTC Zoe. From the units connectivity side the phone has got Bluetooth 4.0 with aptX, Near Field Communication (NFC) and 4G LTE network with support to nano SIM. New One attributes front side dual stereo HTC BoomSound speakers with built-in amplifiers. The new HTC One for 2014 will run Android with HTCs Sense User Interface out of the box.
.JPG)
Source: eBay, GSMArena
Thursday, October 30, 2014
Samsung Galaxy S5 UK and US Pricing and Availability Details
finally the flagship from Samsung is official now and the Samsung Galaxy S5 that has been on the prime list of Smart phones is now available in 125 countries. It is bit confusing how the pricing of the device is going round the world, so let us have a quick glance at the UK and US pricing of this device among Major carriers and retailers. The SIM free pricing is same around the globe so let’s check out what these carriers and retailers are offering to us.

The pricing of Samsung Galaxy S5 among the major carriers in UK and US
Three: In UK the device is available on pay-as-you-go for £549.99 and an initial top up of either £10 or £15 will be provided along with the Smart phone and the data availability for £38 to £41 for a month with £29 upfront payment. This device will be available in Black and White variants initially and may come in different options later.
O2: O2 is offering the Galaxy S5 on a refreshed contract plan for £43 a month with no initial cost for the device and 5 GB of data per month will be offered and for another £5 you can get 8 GB of data. On pay-as-you-go O2 is offering the device for £650 which is pretty high.
Vodafone: Vodafone is offering the Gold variant of this device and will be costing £42 a month with a £19 initial payment for 1 GB of data and unlimited calls and texts. You should pay £52 a month for enjoying 4 GB of data and free phone calls.
EE: 10 GB of data a month for £48 with access to double speed 4G LTE and £53 a month to enjoy 20 Gb of data. The initial payment is £20 and the pay-as-you-go option is not available at this point
In US the Galaxy S5 can be found on many of the major carriers like Verizon Wireless, Sprint, AT&T, Sprint and T-mobile for a price of $199.99 on contract. T-mobile is offering a monthly payment option for the off-contract device.
Retailers will give the SIM free Samsung Galaxy S5 for different prices and let’s check out them.
Carphone Warehouse: Get a SIM free Galaxy S5 for £569.95, but only the black or white variant at launch. Blue will follow on April 22 with gold coming by the end of May. Carphone Warehouse will deal with many carriers and come out with deals, take a look and see what they can offer you in the way of upgrades or new contracts and it is also offering extra £100 cash back when you trade in certain phones with the Samsung Galaxy S5.
Clove: Clove is offering the Galaxy S5 for a price of £522 for the Black, Blue and White variant but it claims that Samsung has delayed the shipment of their stock so they expect to ship starting next week.
Phones 4U: It is offering the SIM free Galaxy S5 for £569.95 for the Black and White variant and Blue is expected to come from April 17th and Gold in May. Contract buyers will get £25 to spend in Google Play and a free Galaxy Tab 3 7-inch for a bargain.
Handtec: The Galaxy S5 is priced for £522 for the Black and White variant but it is still showing as up for pre-order.
Tuesday, October 28, 2014
Use Google as a Calculator and a Converter
Google has always been our first choice as a search engine, it offers us multiple functionalities. But most of us are not aware of this multifunctional search engine, have you ever used Google as a calculator with most of the scientific elements or as a parameter converter ?
I think you havent. Though the downgrading Indian economy stands like a headache for everyone, somehow it helps me to know this Unique feature of Google, I was typing on my search bar 1 dollar= inr and Google instantly resulted a currency converter, similarly I got to know about the Calculator.
In this tutorial I am going to explain the process of finding out the Calculator and Converter in Google search. Being an association of Google, the operations will be resulted well in Google Chrome. Here I go.
Follow the following steps
1) Go to Google
2) Then type on search bar 1 dollar= inr, you will be redirected to the currency converter
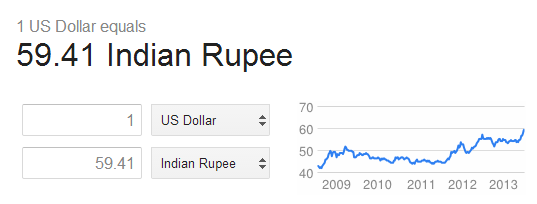
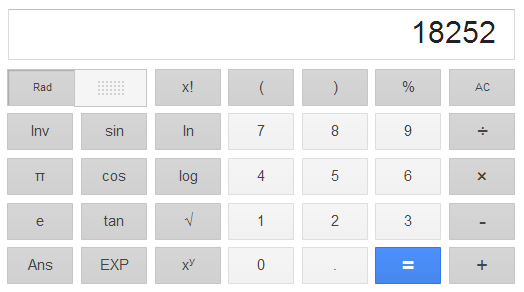
3) Now type 234*78 ( you can type your own ), this will result a calculator with some of the scientific operations like trigonometric functions, square root, logarithmic value, exponential value etc
4) Finally type 1kg=pounds to find out the Weight converter
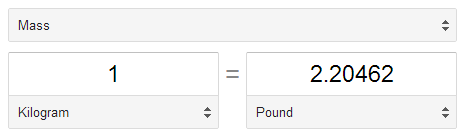
You can generalise this trick to find out the other parameter converters like temperature, length etc. Hope you like the tutorial. If you have any query feel free to ask.
Wednesday, October 22, 2014
A Brilliant App to Hide Pictures Videos and Music On Android for Free
Launch the app, you would be amazed to see that there is no option available to hide anything. Instead of showing the hide options, it displays several volume adjusting features. It allows you to adjust the volume too. On the top, long pressing the Audio Manager title takes you to explore the original feature and purpose of this app.
Read: 13 Funny Google Searches
Below is the screenshot of Hide it Pros home screen.

Then make a new numeric password. The default pin code is 8888
After that, it offers you to set up recovery E-mail. It lets you to retrieve your password in case if you have forgot it. Though its an optional feature, so you can skip it and do it later on.

Then relaunch the app, enter your pin/password. Then it screens many options to hide pictures, videos, music, apps, messages, files. Select as per your choice. Then click on + symbol to create a folder to hide files.

To lock apps, additionally you need to download App Locker Plugin. The plugin can only be launched from inside the Hide it Pro app. You dont see any icon on the app drawer.
Read: Play Nintendo Games on Android
To hide apps, it requires your Android phone must be got rooted.
Okay, if someone comes to know that you are hiding something on your phone, dont worry, it also has an extra brilliant feature. To dig it, click on Settings-->Login Settings-->Fake Password.

Enter a new fake password/pin. Then click OK.
Use this password/pin if you have ever got caught. Hence, this will make your pocket vault look empty and you will get escaped.
Friday, October 17, 2014
Monday, October 13, 2014
How to Activate Camera App and Play Tracks on a Lockscreen on Sony Xperia Z2 Tablet
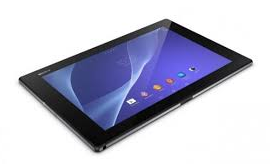 LockLcds dont normally allow users to launch any apps or even take photos. We still need to unlock our Lcds to use certain apps on our handset. But with Sony Xperia Z2 Tablet, you can take photos, record videos and play tracks without unlocking the Lcd. Heres how you can enjoy this feature on your Sony Xperia Z2 Tablet.
To take a photo on a lockLcd
1. Activate first your Lcd by briefly pressing the power key

2. Now activ the camera app
 by dragging the camera icon to the left across the Lcd.
3. And tap
 to take photos or record videos without unlocking your Lcd.
To play an audio on a lockLcd
1. Activate first your Lcd by briefly pressing the power key
.2. Now to display the music player controls, drag
 to the right across the Lcd.
3. And tap
 to play a track on a lockLcd.
To pause an audio track from the lockLcd
1. Activate first your Lcd by briefly pressing the power key
.2. When the music player controls appear, tap
 to pause the track.
To change the currently playing audio track on a lockLcd
1. Activate first your Lcd by briefly pressing the power key
.2. Then tap
 or
or when the music player controls appear.
Sunday, October 12, 2014
How to Add and Resize Widgets on Sony Xperia Z2 Tablet
Adding Widgets on your HomeLcd will help you improve your productivity in using your Sony Xperia Z2 Tablet. If you dont know what widgets means, Widgets are small applications that you can directly use on your HomeLcd. These will serve as your shortcut icon so will no longer need to access your Menu.Follow these steps on how to add widgets on your HomeLcd.
- Tap and hold an empty area on your Home Lcd until your device vibrates.
- There should an option appear, tap on Widgets.
- Select the widget and tap on it you want to add.
- There are some widgets that are resizeable, you can expand them to view the content more on your HomeLcd.
How to resize a Widget:
- Tap and hold the widget you want to resize until it magnifies and the device vibrates. You can tell if the widget is resizeable if the highlighted frame and resizing dots appear.
- You just need to Drag the dots for your preferred size.
- Then tap anywhere on the HomeLcd to confirm the new size of the widget.
Sunday, October 5, 2014
HTC Desire 501 Tips and Tricks How To
 It is very important if you know some tips on your device like HTC Desire 501. It will help you learn more about your device to make your life much easier in using it. Improving your productivity and fulfilling what you expected on your HTC Desire 501.
Here are some How Tos for your HTC Desire 501. These How Tos may still not yet complete and I am finding some time to work on the others:
How to Factory Reset (Hard Reset) HTC Desire 501
Resetting your HTC Desire 501 will restore the default settings of your device. It will also delete all your files on your phone, so it is recommended to have a backup of your important files on your computer. There are two ways on how to reset your HTC Desire 501. It can be done through the settings or through the hardware buttons.
Resetting HTC Desire 501 on Settings:
- Slide the Notifications panel open, and then tap the Gear Icon or Settings.
- Select Backup & reset.
- Tap Reset phone.
- If you want to delete all your files, then tap Erase all data.
- Then tap OK to confirm.
These steps is also helpful when your HTC Desire 501 is unresponsive or frozen and theres no way to access the settings.
- First, press and hold the Volume Down button, and then do the same way on the Power button.
- Hold the two buttons until the three Android images appear on the Lcd.
- Release the button when the three Android images appear and press Volume Down.
- Tap on Factory Reset, and then press the Power Button to confirm.
Contacts is very important for everyone of us. We cant connect to our friends without a contact number. If you have a new phone, saving contacts on the phone one by one is so hassle. But now, theres an easy way how to transfer or import your contacts from your old phone to your new phone.
Use your PC to transfer contacts to your new phone. This process is applicable in several phone brands, including iPhone, Samsung, HTC and Nokia.
You just need an Internet Connection on your PC, your old and new phone and their own USB cable.
Then you need to install the PC Companion program. This is a free application and the installation files are already saved on your new phone. This program can also be used in updating your phone software.
Please note that if you are using the Microsoft Windows 7 operating system on your PC, make sure that the AutoPlay setting is enabled.
To check your settings:
Click Start > Control Panel, then type "autoplay" on the search box. Click the AutoPlay, and mark the check box Use AutoPlay for all media and devices.
Installing the PC Companion:
Installing the PC Companion:
- Turn on your new Phone and connect it to your PC.
- On your new Phone, tap "Install" to install PC Companion on the PC.
- On your computer, if a pop-up window that appears notifies you about available PC Software, select Run Startme.exe.
- Then click Install to start the installation and then follow the instructions to complete the installation.
If you are not prompted with a pop-up window to install the PC Companion, you can also download the PC Companion here.
Transferring your contacts to your new phone:
- Make sure that PC Companion is installed on your PC.
- Open the PC Companion application on your PC.
- Then click Contacts Setup and follow the instructions to transfer your contacts.
How to Send a Multimedia Message and Create a Slideshow on HTC Desire 501
Text messaging has grown its popularity over the years especially to younger generations. People, especially teens, prefer to communicate with friends and relatives thru texting instead of the traditional call. But whether your reaching out to friends thru text or a call, what matters most is the effort for still trying to keep in touch despite distance and even on busy schedules. We should be more grateful these days as it only takes minutes, even seconds, for a quick response unlike the old school snail mail. Now, everyone is just a text away. And more to that, you can even send multimedia messages (MMS) especially on special occasions to add more touch to a simple text-filled Lcd. Heres how you can send a MMS on HTC Desire 501.
1. On your devices homeLcd, tap on
 and go to Messages.
2. Then tap on

3. On the To Field, key in a contact name, mobile number or email address. You can also send it to a group of friends by tapping on

4. To add a subject line, tap on
 and go to Add Subject.
5. Tap on the box that says Add text and there you can type in your special message.
6. Choose an attachment for your message by tapping on

7. After you browse and select an attachment, tap on Send or press
 to save it as a draft. You can also tap on
 to see options like replacing, viewing and removing your attachment.
Now if you wish your Mutimedia Message to reach an extra mile, you can have it on a slideshow format. Heres how you can create one:
once again and select Slide.2. Then choose where you want to insert the next slide.
3. When youre done adding the next slide, you can either do the following:
- tap onand choose to add a video or a photo
- tap onand then audio if you want to add a voice recording or a music to the slide
- tap on Add Text to add a caption
- tap onto view options like replacing, viewing or removing your attachment.
select Preview. If you dont see Preview, scroll down the menu. To view the playback controls, tap once the preview Lcd.5. When its all set and done, press on or tap on Send to save message as a draft.
or tap on Send to save message as a draft.Now you can make someones day a very special one with this creative and personalize MMS.
How to Set HTC Desire 501 into Sleep Mode
How to Set HTC Desire 501 into Sleep Mode
Like any other device, setting HTC Desire 501 into sleep mode will somehow save its battery life. Sleep mode puts your device into a lower power state while the display is off. It also prevents accidental button presses when its in your pocket or bag. Heres how you can set HTC Desire 501 into sleep mode.
1. Briefly press on your devices Power button to turn off the display. Then switch to Sleep Mode.
2. To change the time before your device sleeps, just go to Display & buttons settings.
3. To wake it up, manually press the Power button and unlock your Lcd.
4. Your device will also automatically wakes up when you have an incoming call.
How to Extend Battery Life of HTC Desire 501
1. Briefly press on your devices Power button to turn off the display. Then switch to Sleep Mode.
2. To change the time before your device sleeps, just go to Display & buttons settings.
3. To wake it up, manually press the Power button and unlock your Lcd.
4. Your device will also automatically wakes up when you have an incoming call.
How to Extend Battery Life of HTC Desire 501
Battery Life depends on how you use your device. For HTC Desire 501 device, if you want to save your battery to last longer hours, you may need to adjust your settings. Follow these suggestions:
• Turn on the power-saving option on the device. Then lessen the Lcd brightness and the Lcd lock timeout.
1. Slide the Notifications panel open.
- You can also choose which phone features to conserve the power. Just tap the Power saver notification first before you turn power saver mode on.
2. To turn the power saver mode on or off, tap the check button next to the Power saver notification.
• Turn down your device volume with the volume keys.
• Close any apps or features when you are done using it so they will not continuously running in the background.
• Turn off the network connection if you are out of range so that your device will stop searching for a network signal.
• You should use the latest version of the software update. Software updates improves some features and fixes some bugs on the previous software version.
• Turn off the camera flash.
• The camera viewfinder can be a power drain, so after youve finished taking photos.
How to Take Continuous Camera Shots on HTC Desire 501
Want to take photos continuously on your HTC Desire 501? You just need to set the settings and you can now capture the moment of the action. Every movement of the action counts, so take the photo continuously.
Follow these steps:
1. First, make sure that youre in Normal scene to use this feature.
2. On the Viewfinder Lcd, just press and hold on .
.
.- It should take 20 consecutive shots since it is the default settings.
- If you want to capture more than 20 shots, just tap on the Gear Icon or Settings, then Continuous shooting. After that, clear the Limit to 20 frames option.
3. You can also select the photo that you like most by tapping Best shot. If you dont want the other photos, then you can delete it.
How to Check Battery Usage and History on HTC Desire 501
Keeping our phones at top shape at all times is a serious task. As much as possible, we try to save as much power as we can for our phones to last longer especially if were hitting the road. If youve noticed, here in Zakyri, we always make posts on our blog on ways to save a phones battery life. I might as well share these steps for all HTC Desire 501 users out there on how you can check battery usage on your phone. In this way you can see a ranking list of apps that are consuming up your battery life and even how long youve been using up your phone since the last charge. This is a pretty good information when you badly need to save up your battery life.
To check on each apps battery consumption:
1. On your homeLcd, slide the Notifications panel open.
2. Then tap
3. Choose and tap on Power and go to Usage.
4. And tap an app to check how its using up your phones battery and other use details.
If you see a button while viewing an apps battery use details, you can tap that button to adjust its settings that affect your battery usage, you can stop the app and more.
To check on your battery history
1. On your homeLcd, slide the Notifications panel open.
2. Then tap.
.3. Choose and tap on Power and go to History.
4. Now swipe left or right ( or spread or pinch your fingers) to scale the graph that details your battery usage over the time.
How to Clear Call History on HTC Desire 501
Either your call logs are just piling up or you simply want to achieve a clean call history list, then you can do the steps below. Heres how to delete or clear call history on your HTC Desire 501 device.
To delete one name or number
1. On your devices Call History tab, press and hold the name or number you wish
to delete.
2. And tap Delete from call history.
To delete the entire call history list
1. On Call History tab, tapthen go to Remove call history.
then go to Remove call history.2. On the Delete from call history Lcd, tap
3. Choose Select all and then tap Delete.
How to Hide Missed Calls and Messages on HTC Desire 501 LockLcd
Some mobile users want to check if theres any missed calls or messages right when they pick up their phone even if its locked. But if youre like me who prefers a clean lockLcd, free from missed calls and messages notification, then you might as well follow these steps to keep them hidden. Heres how you can hide those info on a HTC Desire 501 lockLcd.
1. First, slide the Notifications panel open.
2. Then tap .
.
.3. Now go to Security.
4. And clear the Phone notification preview and Message notification preview options to hide missed calls and messages on the lockLcd.
Now you can appreciate more how your phone looks like when its locked. Looking clean and free.
How to Personalize HTC Desire 501 Launch Bar
A launch bar is a one stop hub on your homeLcd for commonly used apps. By personalizing your launch bar you can now have a one-touch access to apps that you often use. These apps and shortcuts on your launch bar are also what you see on the lockLcd. Heres how you can personalize your HTC Desire 501 launch bar.
1. On your devices homeLcd, tapto go to the All apps view.
to go to the All apps view.2. Now press and hold the app you want to be replaced and then drag it out
of the launch bar.
3. Then press and hold an app you frequently use and drag it to the empty slot
on your launch bar.
If you have couple of apps to place on your launch bar, you can group them into a folder and place them in the launch bar. Heres how you can group apps into a folder.
1. On the All apps view of your device, press and hold an app and drag it over
to another app to automatically create a new folder for these apps.
2. To add more apps, press and hold an app and drag it to the folder.
3. Now drag the folder from the All apps view to the launch bar.
4. If you want to remove an app from a folder on the launch bar, you need to
switch first to the All apps view and then drag the app out of the folder.
Congratulations! You have just personalized your HTC Desire 501 launch bar with your favorite apps.
How to Set up Speed Dialing on HTC Desire 501
Speed dialing is definitely a must-have feature on any phones. Whether youre in a hurry or in an emergency, this feature lets you call important contacts right away by just dialing a number key on your phone. For all HTC Desire 501 users, heres how you can set up speed dialing on your device.
1. First, open the phone app on your device.
2. Then tapand go to Speed Dial.
and go to Speed Dial.3. Now tapand select a contact from the list.
and select a contact from the list.4. On the Speed dial Lcd, choose the phone number of the contact to use
and a speed dial key to assign for that contact.
5. Once your done, tap Save.
Take note that the number 1 key is generally used and reserved for calling voicemail and retrieving voicemail messages.
How to Make Your HTC Desire 501 a Wireless Router
Smartphones these days can now share its mobile data connection and act as a portable Wi-Fi hotspot. And like those high-end gadgets, HTC Desire 501 is sure to let you experience the benefits of making it as a portable Wi-Fi hotspot. Heres how you can make your HTC Desire 501 phone the next Wi-Fi hotspot.
- Slide the Notifications panel open, and then tap the Gear Icon or Settings.
- Under Wireless & Network, tap More.
- Select Mobile network sharing > Portable Wi-Fi hotspot settings.
- Enter your preferred router name, or you can also use the default name.
- Choose the type of security and set a password for your wireless router. (If you selected none, then you dont have to enter a password.)
- Select the Portable Wi-Fi Hotspot option to turn on the wireless router.
When you see the router wireless icon, then your HTC Desire 501 is ready to be used as a router.
Copying Files to or from HTC Desire 501
You can copy your music, photos, and other files to HTC Desire 501.
1. Connect HTC Desire 501 to the computer using the supplied USB cable. Youll see options for viewing or importing files on the computer Lcd.
2. Choose to view files.
3. Copy the files from your computer to HTC Desire 501, or vice versa.
4. After copying the files, disconnect HTC Desire 501 from the computer.
Copying Files to or from HTC Desire 501
You can copy your music, photos, and other files to HTC Desire 501.
1. Connect HTC Desire 501 to the computer using the supplied USB cable. Youll see options for viewing or importing files on the computer Lcd.
2. Choose to view files.
3. Copy the files from your computer to HTC Desire 501, or vice versa.
4. After copying the files, disconnect HTC Desire 501 from the computer.
Subscribe to:
Posts (Atom)